

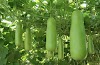
Upo, also known as bottle gourd or calabash, is a popular vegetable in many parts of the world. It is a long, cylindrical-shaped vegetable that can grow up to 60 cm in length and has a pale green color. Upo is a warm-season crop that can be grown in most tropical and subtropical regions. It is rich in vitamins, minerals, and fiber, making it a healthy addition to any diet.
In this Upo cultivation guide, we will cover the following topics:
- Site Selection and Soil requirements
- Growing Season, Climate and temperature requirements
- Propagation methods
- Planting and spacing requirements
- Irrigation and fertilization requirements
- Pest and disease management
- Harvesting and post-harvest handling
By following this guide, you can successfully grow Upo and enjoy its health benefits in your home garden or farm.
Selection of Varieties
For better yield and profit, select varieties that are adaptable to local conditions, market preference and resistant to insect pests and diseases. To guide you in selecting the right varieties, refer to the table below:
|
Variety |
Origin/Brand/ Supplier |
Maturity (DAS) |
Color |
Shape |
Features |
|
Dalisay F1 |
East-West Seed Company |
65 |
Bright Green
|
Cylindrical with slight neck |
All year round, early and very productive fruit setting; disease tolerant |
|
Gauri F1 |
Harveson |
42-45 |
Light Green
|
Long cylindrical |
High yielding; early maturing; fruits are good for long distance transportation |
|
Magnifica |
East-West Seed Company |
55 |
Glossy Bright Green
|
Uniform size and shape |
Recommended for year-round cropping; class “A” fruits; longer maturation period |
|
Tambuli |
East-West Seed Company |
60 |
Bright Green
|
Cylindrical shape |
All season variety; strong against fungal infection |
|
Velentina F1 |
Pilipinas Kaneko |
65-70 |
Light Green
|
Straight cylindrical |
Early maturing; high yielding; produces 12-16 fruits per plant |
|
Upo Grande |
Pilipinas Kaneko |
85 |
Greenish White |
Slender |
Year round; long pointed fruits, size of fruit is 7.6 x 63 cm. |
Site Selection and Soil Type
Upo thrives in well-draining soil that is rich in organic matter. The ideal soil for Upo cultivation is loamy soil with a pH between 5.5 and 6.5. The soil should be free of rocks, debris, and other materials that can impede root growth and cause drainage problems.
Before planting, it is important to prepare the soil properly. This involves tilling the soil to a depth of 15-20 cm and incorporating organic matter such as compost, aged manure, or leaf litter. This will improve soil structure, increase water-holding capacity, and provide essential nutrients to the plants.
Upo also requires adequate soil moisture for optimal growth. Therefore, it is important to ensure that the soil is well-draining and does not become waterlogged. Excessive soil moisture can lead to root rot, which can be detrimental to plant growth. The production of female flowers is significantly affected when soil conditions are not optimal.
To maintain soil fertility, it is recommended to rotate crops and add fertilizers as needed. Adding organic matter to the soil on a regular basis will also help maintain soil fertility and support the growth of healthy Upo plants.
Growing Season, Climate and temperature requirements
Upo is a warm-season crop that requires a warm and humid climate for optimal growth. While Upo can be grown in a wide range of climates, excessive rainfall can have negative effects on its growth, the ideal temperature range for Upo cultivation is between 30 -35°C (77-95°F). When temperatures are extremely high, the plant may produce more male flowers, which can decrease yield. It is sensitive to frost and cold temperatures, so it is important to avoid planting it during the colder months.
Upo also requires a high level of humidity, particularly during the flowering and fruiting stages. Humidity levels between 70-90% are ideal for Upo cultivation. In regions with low humidity, it may be necessary to irrigate regularly and mulch around the base of the plants to maintain moisture levels.
In addition to warm temperatures and high humidity, Upo requires a lot of sunlight for optimal growth. It is recommended to plant Upo in a location that receives at least 6 hours of direct sunlight per day. This will promote healthy growth and the development of fruits.
Although Upo can be planted throughout the year, the optimal planting periods for maximum yield and profitability are between October to December and May to July.
Land Preparation
Prepare the field as early as possible to give enough time for the weeds and stubbles of previous crops to decompose. Plow and harrow 2 to 3 times alternately at one week interval. Plow at a depth of 15 to 20 cm. Harrow twice to break the clods and level the field. A well-pulverized soil promotes good soil aeration and enhances root formation.
Prepare bed 3.0 meter apart and 1.0 meter between hills.
Seed Preparation
- A hectare of farm requires 1 to 2 kg of seeds.
- Soak the seeds in clean water for 24 hours.
- Pre-germinate the seeds by wrapping in a moist cloth and place in cool and dark place. Incubate until the seed coat breaks.
Method of Planting
Bottle gourd is often direct seeded like squash however, seedlings can also be transplanted. The distance of planting is from 3 to10 meters. During wet season, plant the seeds on mounds and during the dry season in furrows with 2 seeds per hill. Thin-out weak seedlings 7days after emergence and retain only one plant per hill.
Direct Panting
- Plant one pre-germinated seeds per hill at a distance of one meter between hills.
- Cover the seeds with thin layer of soil.
- During wet season, plant in ridges or above furrows to prevent rotting of seedlings due to flooding.
Transplanting
- Use a prepared media of one part compost or organic fertilizer, one part clay soil and one part carbonized rice hull. A ready mixed commercial soil media for seedling production can also be used.
- Fill in plastic bags, potlets or seedling trays with the prepared media.
- Water the potting media before sowing. Sow one pregerminated seed per potlet.
- Place the seedling trays/potlets under a temporary shade
- Maintain the seedlings by watering regularly when needed.
- Harden the seedlings by gradually reducing the frequency of watering and exposing to direct sunlight.
- Transplant one seedling per hill at a distance of one meter between hills 15 days after emergence or when true leaves have developed.
- Transplant in the afternoon or during cloudy days.
- Replant missing hills immediately.

Fertilizer Application
The kind and amount of fertilizer to apply depends on soil fertility and soil type. To achieve optimum yield, have your soil analyzed at the Soils Laboratory nearest you to determine the right nutrient requirement of the soil. In the absence of soil analysis, apply the following fertilizers at the time and amount specified:
|
Type of Fertilizer |
Rate of Application/ha. |
Time of Application |
Method of Application |
|
14-14-14 |
2 bags |
||
|
Organic (fully decomposed animal manure or commercial organic fertilizer) |
20 bags |
During planting |
Basal |
|
46-0-0 |
2 bags |
30 days after planting |
Side dress |
|
46-0-0 + 0-0-60 (2:1) |
2 bags +1 bag |
45 days after planting |
Side dress |
Cover the basal fertilizer with thin soil before planting to avoid direct contact with the roots of the seedlings. Place the sidedress fertilizer 10 cm away from the base of the plants to avoid burning effects.
Trellising
Provide the plants with trellis to produce fruits of good quality. Trellising is also essential during the wet season to minimize fruit rotting and malformation. Construct overhead trellises at a distance of 2 to 3 m wide and 2 m high using ipil-ipil or bamboo poles. Provide strong roof trellis by intertwining tie wire or nylon twine crosswise and lengthwise on top of the trellis. Provide a ladder-like trellis or vertical pole for each upoplant to facilitate the vines to climb up. Train the vines to climb the trellis by tying the stem lightly on the vertical pole or ladder-like trellis until it reaches the overhead trellis.
Pruning
To promote branching and fruiting, remove the tip of the main vine and the lower lateral branches that appear on the climbing part of the main stem.
Weed Control
Bottle gourd is moderately deep-rooted with extensive lateral root system.Weeds near the row of the plants can be controlled by off-barring or re-plowing 14 days after planting. Hill-up at 15 to 20 days after emergence or 1 month after planting if un-mulched. Minimize cultivation during the fruiting stage to avoid disturbing the roots. Hand weeding is recommended during this stage.
Irrigation and Water Management
Irrigate the field 14 days after emergence by flooding. Repeat irrigation every seven days throughout the growing season or as need arises.
Bottle gourd is sensitive to excessive soil moisture, which favors disease infection. Provide adequate drainage during wet season to avoid water logging. Furrow irrigation is recommended during dry season at weekly interval. Spread rice straw around the base of the plants as mulch to conserve moisture and minimize watering during dry season.
Insect Pest and Disease Control
To prevent insect pests damage and disease infection, practice good cultural management and sanitation. Most common insect pest of upo is the yellow beetle and the most common disease is fruit rot. In case of disease infection or pest infestation, follow the management practices for specific disease or pest provided in the Insect Pest and Disease Management Guide for Lowland Vegetables. Flowers of upo usually open in the afternoon. Protect insect pollinators because they are contributors to fruit development. Avoid applying pesticides in the afternoon (after 4:00 PM).
|
Control |
|
|
Leaf folders |
Methomyl |
|
Yellow squash beetle |
Deltamethrin |
|
Disease |
Control |
|
Anthracnose |
Captan |
Harvesting
Fruits develop very fast and require much attention at harvest time. Harvesting can be done when fruits meet the standard size base on the varietal characteristics. It usually takes 15 days to reach marketable size from the day of fruit set or 60 to 80 days from sowing. Harvest fruits using a sharp knife by cutting the peduncle, leaving approximately 5 cm length. Put harvested fruits in a woven basket lined with banana leaves to avoid skin bruises. Pack marketable fruits in plastic bags.


 Cultivation Guide: All You Need to Know in Planting, Growing and Harvesting Upo)
0 Comments