
Duck farming, or itik production, is the second most important poultry enterprise in the Philippines after chicken. What makes it particularly attractive is the nature of its primary outputs: balut and salted eggs are deeply embedded in Filipino food culture, which creates a demand base that is both large and remarkably consistent. You will not find balut getting displaced by an imported substitute anytime soon. For farmers who set it up properly, a well-managed flock of Itik Pinas can produce over 200 eggs per duck per year and generate a steady daily income from a modest plot of land. This guide covers everything you need to know to run a profitable duck farm in the Philippines.
📋 Table of Contents
- Why Duck Farming: Market Demand and Income Potential
- Free-Range vs Confined: Choosing Your Production System
- Duck Breeds: Itik Pinas and Other Philippine Varieties
- Farm Site Selection and Basic Requirements
- Duck Housing: Design, Dimensions, and Stocking Density
- Brooding Newly-Hatched Ducklings (Seho)
- Growing Period: 1 Month to 4.5 Months
- Laying Period: Managing Your Egg-Producing Flock
- Feeding and Nutrition by Life Stage
- Health Management and Disease Prevention
- Farm Records: What to Track and Why It Matters
- Balut, Salted Eggs, and Other Market Outlets
- Cost and Return Estimates
- Frequently Asked Questions
1Why Duck Farming: Market Demand and Income Potential
In terms of providing income from egg and meat production in the Philippines, ducks rank second only to chickens. That is not a marginal position. The Philippines is among the largest balut-producing countries in the world, and balut consumption is not a fad or a novelty food for tourists. It is a genuine daily market across streetside vendors, palengkes, and online delivery services in every major city and province.
Beyond balut, the salted egg market has expanded significantly. Itlog na maalat now appears not just in wet markets but as an ingredient in premium restaurant dishes, artisanal food products, and processed snacks. This has created a premium tier in what was historically a price-sensitive commodity market, and it benefits growers who can supply consistent, high-quality eggs.
Despite its potential, the sector faces real challenges: high production costs, inconsistent genetic stock in many farms, limited access to credit, and the persistent difficulty of sourcing quality day-old ducks outside of a few provinces. The good news is that the government has addressed the genetics problem directly through the Itik Pinas program, and properly managed confined flocks now routinely outperform traditional free-range systems by a wide margin.
2Free-Range vs Confined: Choosing Your Production System
The choice of production system is the most consequential decision a duck farmer makes, because it determines land requirements, labor, feed cost, egg output, and the investment you need to get started. Both systems are actively used in the Philippines and both can be profitable. The question is which one fits your situation.
| Factor | Free-Range (Pastured) | Confined (Barn) |
|---|---|---|
| Feed cost | Low — ducks forage in rice paddies | High — 100% formulated or supplemented feed |
| Egg production | Lower, seasonal, less predictable | Higher and more uniform; over 200 eggs/hen/year possible |
| Housing investment | Minimal — portable temporary shelters | Significant — permanent pen required |
| Land requirement | Access to rice paddies required | Small land area sufficient |
| Labor | Higher — herding required daily | Lower — ducks confined and managed in place |
| Disease risk | Higher — exposure to wild birds and pests | Lower — controlled biosecure environment |
| Best for | Farmers with rice farm access; supplemental income | Commercial production; primary livelihood |
Many experienced Philippine duck farmers use a combined system: ducks are raised free-range on rice paddies from 1 to 4.5 months of age, which dramatically cuts feed costs during the growing phase. At 4.5 months, as ducks approach laying age, they are moved into permanent confined housing for the remainder of the production cycle. This approach captures the feed savings of free-range growing with the higher egg output and management control of confinement laying.
3Duck Breeds: Itik Pinas and Other Philippine Varieties
The quality of your duck breeding stock determines your ceiling for egg production. This is the single most important input decision you make, and the Philippine government has invested significantly in getting it right. Here is what you need to know about the breeds available to Philippine duck farmers.
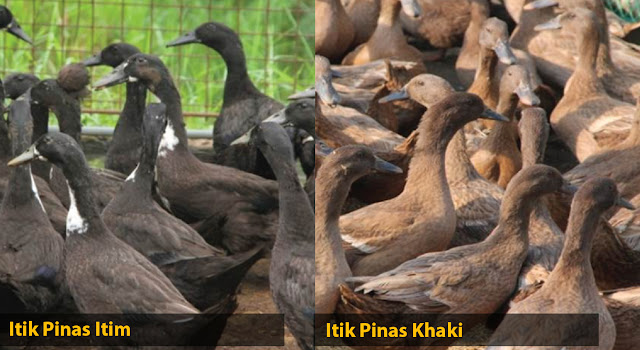
Itik Pinas-Itim (black) and Itik Pinas-Khaki — the two pure lines developed through selective breeding at BAI-NSPRDC, Tiaong, Quezon.
Background: Why Breed Quality Matters
The Philippines imported Khaki Campbell ducks in 1950, followed by Pekin ducks for meat production and Tsaiya ducks from Taiwan. Over time, the lack of disciplined selection caused genetic dilution. Philippine flocks ended up with inconsistent body sizes, egg sizes, and laying rates — a problem that directly reduced farm profitability. This decline was addressed by research funded through PCAARRD-DOST and BAI-DA, conducted at the National Swine and Poultry Research and Development Center (NSPRDC) in Brgy. Lagalag, Tiaong, Quezon.
The result of that research is Itik Pinas — a pure native breed with uniform physical characteristics, high egg production, and adaptability to Philippine farming conditions.
Key Production Characteristics of Itik Pinas
| Characteristic | Performance |
|---|---|
| Body weight at 5 months | 1.3 to 1.5 kg |
| Age at first laying | 18 to 22 weeks (about 5 months) |
| Eggs per hen per year | Over 200 eggs |
| Egg weight | 65 to 75 grams |
| Laying period per cycle | Over 10 months |
| Feed consumption (starter to layer) | 10 to 12 kg total per duck |
| Male-to-female ratio (for fertile eggs) | 1 drake per 10 hens |
| Disease resistance | Adapted to local conditions; higher resistance than exotic breeds |
Where to Source Itik Pinas
The primary source is BAI-NSPRDC in Brgy. Lagalag, Tiaong, Quezon, which continues to breed and multiply Itik Pinas for distribution to duck farmers. Accredited partner multiplier farms in Nueva Ecija, Batangas, Laguna, and Quezon also supply day-old ducklings (seho) and breeding stock. Contact BAI-NSPRDC directly or check with your nearest DA Provincial Office for referrals to accredited suppliers in your region.
4Farm Site Selection and Basic Requirements
Where you put your duck farm matters almost as much as how you manage it. Ducks are messier and louder than chickens, and a poorly sited farm creates problems with neighbors, regulatory compliance, and water supply that compound over time. Evaluate these factors before breaking ground.
- Agricultural zone location. Duck farms should be situated in areas classified for agricultural use, not in residential or commercial zones. Check your local zoning ordinance or coordinate with the municipal agriculture office before construction.
- Distance from residences. Duck farms produce noise (ducks are more vocal than chickens) and odor from manure. A minimum buffer distance from homes is not just courtesy — it prevents complaints that can result in cease-and-desist orders. Some municipalities specify minimum distances in their local ordinances.
- Reliable water source. Ducks consume significantly more water than chickens and need bathing water to maintain feather quality and reduce heat stress. A dependable water supply — whether from a deep well, river, or water district connection — is non-negotiable.
- All-weather road access. You need to move feed in and eggs out year-round. A farm that becomes inaccessible during typhoon season or the wet season is a logistical liability for a business with daily perishable output.
- Room for expansion. If your first flock does well, you will want to grow. Acquiring additional land after the fact is difficult and expensive. Choose a site with enough adjacent space for a realistic 3 to 5 year expansion scenario.
5Duck Housing: Design, Dimensions, and Stocking Density
Duck housing in the Philippines does not need to be elaborate or expensive. What it does need to be is dry, well-ventilated, easy to clean, and properly sized. A house that fails on any of these points produces stressed, underperforming ducks regardless of breed quality or feed quality.
Orientation and Basic Dimensions
- Orientation: Position the duck house lengthwise from east to west. This maximizes morning and afternoon shade on the long walls, reducing heat load inside the pen during the hottest parts of the day.
- Width: Keep the house no wider than 8 to 12 meters. Houses wider than this develop poor cross-ventilation in the center, leading to ammonia buildup and respiratory problems in the flock.
- Roof pitch: Use a roof slope of 10 to 30 degrees. Install a ridge vent (bubong) at the peak to allow hot air and ammonia to escape upward continuously.
- Floor type: Either elevated slatted flooring (allows droppings to fall through, keeping ducks dry) or ground-level housing (kamalig type) with deep litter bedding. Elevated slatted housing provides better sanitation but higher construction cost. Ground-level housing is more affordable but requires more frequent litter management.
- Bathing area: Include a dedicated bathing area — a concrete basin about 1 meter wide and 15 to 20 cm deep (6 to 8 inches). Ducks use this to cool down, clean their feathers, and reduce heat stress. This is particularly important during the dry season.
Stocking Density by Age
| Duck Age | Floor Space per Duck | Ducks per sq m |
|---|---|---|
| 0 to 1 week old | 333 sq cm | 30 ducks |
| 1 to 2 weeks old | 500 sq cm | 20 ducks |
| 2 to 8 weeks old | 1,250 sq cm | 8 ducks |
| 8 to 18 weeks old | 2,000 sq cm | 5 ducks |
| Above 18 weeks (laying) | 2,500 sq cm | 4 ducks |
For elevated slatted housing, limit groups to 100 ducks per pen. For ground-level housing, 300 to 500 ducks per group is manageable.
Three-Zone Layout for Laying Houses
A well-designed laying house should have three distinct zones within the same structure.
- Egg-laying zone: A quiet, darker, low-traffic area where ducks go to lay. This is typically at one end of the house. Collect eggs from here at fixed times — usually early morning since ducks tend to lay between midnight and 8 AM.
- Feeding and drinking zone: The main activity area where feeders and waterers are placed. Keep this area clean and ensure waterers are positioned to prevent spills from soaking the laying zone.
- Activity and bathing zone: The area with the bathing basin where ducks can move, exercise, and socialize. Good activity reduces stress-related drops in egg production.
6Brooding Newly-Hatched Ducklings (Seho)
Newly hatched ducklings, called seho, cannot regulate their own body temperature for the first two weeks of life. Without proper brooding, they quickly become chilled, develop abnormally, or die. Getting brooding right is the most critical step in the entire duck production cycle because the losses happen fast and cannot be recovered.

Newly hatched ducklings need artificial heat for the first 2 weeks. Note the circular brooder guard that prevents piling in corners.
Brooder Setup
- 1Build the brooder guardUse GI sheet or cardboard 60 cm (2 feet) high, bent into a circle or square to create a confined warm zone. A circular shape prevents ducklings from piling in corners, which causes smothering. Set this up at least 24 hours before the ducklings arrive.
- 2Lay bedding materialSpread 5 to 10 cm of clean, dry rice straw, dried leaves, or wood shavings inside the brooder. Do not use sawdust for very young ducklings — they may eat it. Add fresh bedding every day, focusing on the waterer area where dampness accumulates fastest. Wet bedding causes respiratory disease and ammonia buildup.
- 3Install the heat sourceUse an incandescent bulb at 1 watt per duckling. Place a steel reflector over each bulb to direct heat downward toward the ducklings. Hang bulbs 15 cm (6 inches) above the bedding. Alternatively, a bucket with burning charcoal placed in a safe location outside but near the brooder also provides effective radiant heat for backyard setups.
- 4Set up feeders and waterersA 1-gallon plastic drinker serves 50 ducklings. Place clean gravel or pebbles in the base of the drinker to prevent ducklings from getting wet during the first week (wet ducklings lose body heat rapidly). Nipple drinkers are the cleanest option and keep bedding drier. Feed using shallow trays or sack feeders within easy reach of all birds.
- 5Separate males and females from Day 1With Itik Pinas-Kayumanggi (crossbred), sex can be determined by feather color at hatch. Separate from Day 1 to prevent unwanted early mating and to allow sex-specific feeding programs if needed.
Temperature Guide
| Week | Required Temperature | What to Watch |
|---|---|---|
| Week 1 | 32°C (continuously) | If ducklings spread away from heat: too hot. If they huddle close to heat: too cold. |
| Week 2 | 32°C (reduce if weather is very hot) | Reduce heat during daytime on hot days; maintain at night |
| Week 3 onward | Artificial heat no longer needed | Ducklings can now regulate body temperature independently |
Daily Brooding Tasks
- Feed and give clean, fresh water 2 to 3 times daily
- Clean feeders and drinkers at every feeding
- Add fresh bedding in damp areas; full bedding change when wet or compacted
- Check heat source — ensure warmth is consistent
- Remove weak, sick, or dead ducklings immediately; bury or burn carcasses
- Record daily mortality, feed consumption, and any observations
7Growing Period: 1 Month to 4.5 Months
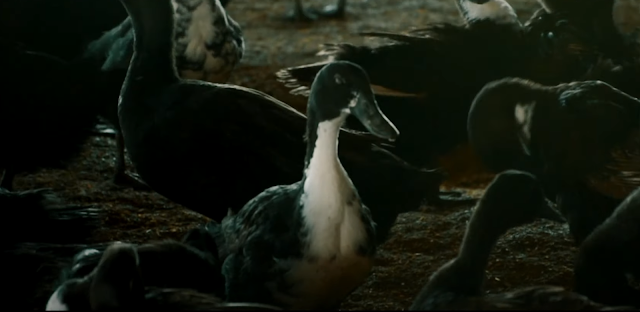
Itik Pinas-Itim ducks at the growing stage. This period from 1 to 4.5 months is when free-range pasture access cuts feed costs most effectively.
At one month old, ducklings leave the brooder and move into a grower house or, if you are using the combined system, into a pasture area with a temporary shelter. This growing phase lasts until 4.5 months of age, when ducks approach laying maturity and need to be moved into the permanent laying house.
Grower House Setup
Prepare the grower house at least 2 weeks before the scheduled transfer. Clean and disinfect the pen, check roofing and walls for damage, and ensure feeders, waterers, and bathing basins are in place. Use rice straw or wood shavings as litter flooring.
- Weigh a random 5% of the flock once a week, in the morning before feeding, to track growth against breed standards and calibrate feed amounts
- Introduce male ducks to females at 16 weeks of age for fertility, at a ratio of 1 drake per 10 hens. Allocate a 5% reserve of males to replace those that become sick or die
- Provide a bathing area to reduce heat stress and keep feathers clean — essential for duck welfare and egg quality
- Keep bedding dry at all times; remove and replace damp litter promptly
- Separate and isolate any sick, lame, or injured birds immediately; do not house ducks of different ages in the same pen
Free-Range Growing on Rice Paddies
In the traditional free-range system, ducks spend this entire 20 to 24 week growing period in rice paddies, foraging on fallen rice grains, sprouted seeds, insects, snails, fish fry, and aquatic vegetation. This natural diet significantly reduces purchased feed cost and supports good health through diverse nutrition. The tradeoff is the need for portable shelters and daily herding. Shelters are typically made of ipil-ipil poles, bamboo, fishnet fencing, rice straw, and rice hull — locally available, lightweight, and easy to relocate as the flock moves between paddies.
8Laying Period: Managing Your Egg-Producing Flock
At 4.5 months (18 weeks), ducks are moved from the grower house or free-range paddies into the laying house. This transition marks the beginning of the most economically productive phase of the flock's life. Managing this phase well directly determines your income.
Transition to Laying House
- Move the flock gradually if possible — sudden changes of environment cause stress that delays the onset of laying
- Transition feed from layer developer to layer pellets between 4 and 5 months of age (see Feeding section)
- Ensure the laying zone is dark, quiet, and clean — ducks will use the same laying spots consistently if they are comfortable there
- Collect eggs early in the morning (ducks lay primarily between midnight and 8 AM)
- Maintain the drake ratio at 1 male per 10 females for fertile egg production for balut
Signs of a Well-Performing Flock
Lighting for Egg Production
Ducks, like chickens, are photo-sensitive. Day length influences their laying rate. In the Philippines, natural daylength is relatively consistent year-round (12 to 13 hours), which is less of a management variable than in temperate countries. However, if your laying house is darker than 8 lux at duck eye level, artificial lighting during evening hours (extending light exposure to 14 to 16 hours) can help maintain peak laying rates during naturally shorter photoperiods. Use LED lights (20 to 30 watts per 100 sqm area) on a timer for this purpose.
9Feeding and Nutrition by Life Stage
Feed is the largest single expense in confined duck production, typically representing 60 to 70% of total operating cost. Getting the right feed to the right birds at the right life stage is not a minor detail. Underfeeding slows growth and delays laying. Overfeeding protein wastes money and can cause leg problems in growing ducks. The guide below is based on BAI feeding recommendations for Philippine duck production.
Feeding by Life Stage
- Week 1–2
(Brooding)Duck (or chicken) starter mash fed ad libitum. Rice grains may be added to the mash as an energy supplement. Water freely available at all times. - Week 3–4
(Transition)Mixture of duck starter mash and duck grower mash fed ad libitum. Begin transitioning away from starter to reduce unnecessary protein cost. - 1–4 months
(Growing)Duck grower mash — 14% crude protein minimum. In free-range systems, natural forage supplements or replaces commercial feed during this period. In confined growing, provide commercial grower mash plus rice bran as an extender. - 4–4.5 months
(Pre-lay)Duck layer developer — prepares the reproductive system for egg production. This bridges the gap between growing and laying nutrition. - 4.5 months+
(Laying)Duck layer pellets — minimum 18% crude protein, with adequate calcium (2.5 to 3.5%) and phosphorus for eggshell quality. This is the primary feed for the entire laying period. Total feed consumed from start to laying age: 10 to 12 kg per bird.
Supplemental and Alternative Feeds
Rice bran, snails, freshwater fish, and kitchen scraps are common feed supplements for Philippine backyard and semi-commercial duck operations. These can significantly reduce the feed bill but must be used carefully to maintain nutritional balance. Snails are an excellent calcium and protein source. Spoiled or moldy supplemental feeds must never be offered — mold toxins suppress egg production and cause chronic liver damage in laying ducks.
10Health Management and Disease Prevention
Native Philippine ducks like Itik Pinas have stronger natural resistance to common local diseases than exotic imported breeds. But natural resistance is not immunity, and a poorly managed duck house can overcome even robust genetics. Disease prevention through biosecurity and good husbandry is always cheaper and more reliable than treatment.
Biosecurity Basics
- Never introduce newly purchased ducks directly into an existing flock. Quarantine all new arrivals for at least 2 weeks in a separate facility before mixing with the established flock
- Do not allow visitors into the duck house without providing dedicated footwear or shoe covers and clean clothing
- Control access by rodents (rats, mice) and wild birds, which carry Newcastle disease, Duck Plague, and other pathogens
- Do not mix ducks of different ages in the same pen — disease transmission between older carrier birds and naive young stock is a leading cause of flock-wide outbreaks
- Bury or burn dead ducks immediately. Never allow dead birds to remain in the pen or be dumped in open areas near the farm
Major Duck Diseases in the Philippines
| Disease | Signs | Cause | Prevention / Management |
|---|---|---|---|
| Duck Plague (Duck Virus Enteritis) | Sudden high mortality, bloody diarrhea, droopiness, nasal discharge | Herpesvirus (DVE) | Vaccination; strict biosecurity; do not mix with wild waterfowl |
| Duck Cholera (Fowl Cholera) | Sudden death, swollen wattles, greenish diarrhea, difficulty breathing | Pasteurella multocida (bacteria) | Vaccination; clean water supply; avoid stress; antibiotic treatment under vet supervision |
| Duck Hepatitis | Affects ducklings under 3 weeks; sudden death with backward arching of the head and neck | Duck Hepatitis Virus (DHV) | Vaccination of breeders for maternal immunity; brooder hygiene; early detection |
| Newcastle Disease | Respiratory distress, nervous signs, drop in egg production; ducks less susceptible than chickens but can carry virus | Paramyxovirus | Vaccination; biosecurity against contact with chickens and wild birds |
| Riemerella (New Duck Disease) | Head shaking, twisted neck, green diarrhea, eye and nasal discharge in ducklings | Riemerella anatipestifer (bacteria) | Good ventilation; reduce crowding; antibiotic treatment under veterinary supervision |
| Aspergillosis | Difficulty breathing, gasping, reduced appetite in young ducks | Aspergillus fungus from moldy bedding or feed | Use only clean, dry bedding; never feed moldy feed; improve ventilation |
Recognizing a Healthy vs Sick Duck
| Indicator | Healthy Duck | Sick Duck |
|---|---|---|
| Activity | Alert, active, moving around | Lethargic, sitting alone, reluctant to move |
| Feathers | Clean, smooth, dry | Ruffled, wet, soiled around vent |
| Eyes | Bright, clear | Dull, sunken, or with discharge |
| Droppings | Normal, formed, brownish-green | Watery, bloody, or abnormally colored |
| Appetite | Eats and drinks normally | Reduced feed and water intake |
| Uniformity | Similar size and appearance to flock-mates | Noticeably smaller, lighter, or different feathering |
11Farm Records: What to Track and Why It Matters
Duck farming is a numbers business. Feed conversion, laying percentage, mortality rate, and cost per egg are not just accounting entries — they are the feedback system that tells you whether your flock is performing as it should and where your income is leaking. Many Philippine duck farmers struggle to improve their operations simply because they have no baseline data to compare against.

A simple daily farm record captures the data you need to track flock performance and spot problems early.
Keep a daily farm logbook that records at minimum:
- Flock count — total birds at the start of each day
- Egg count — number of eggs collected that morning; calculate daily laying percentage
- Feed consumed — total kilograms given; compare against expected feed conversion ratio
- Mortality — number of deaths; note any observations about signs or cause
- Sales and income — eggs sold, price received, buyer
- Expenses — feed cost, medicine, labor, and any other inputs that day
- Flock weight — weigh 5% of the flock weekly (before morning feed); track against breed growth standards
- Medication and treatments — what was given, dose, duration, and reason
A simple spiral notebook works perfectly well for small flocks. For larger operations, a spreadsheet lets you calculate laying percentage, feed cost per egg, and mortality rate automatically. These three numbers give you enough information to make informed decisions about feed, health interventions, and flock replacement timing.
12Balut, Salted Eggs, and Other Market Outlets
Understanding your market outlets before you start determines how you manage the flock and what product quality you need to deliver. Philippine duck eggs have several distinct market channels, and different channels reward different things.
Balut
Balut is a fertilized duck egg incubated for 16 to 18 days, producing a partially developed duckling inside the shell. It is the highest-volume and most widely distributed market for Philippine duck eggs, sold from street vendors to online delivery platforms. Balut buyers need eggs that are consistently fertile, with a specific size and shell quality. This requires a drake in the flock (at the standard 1:10 ratio) and eggs collected promptly for delivery to hatcheries or balut makers. Large, uniform eggs from Itik Pinas are preferred by most balut processors because larger eggs produce a more developed and better-tasting product.
Salted Eggs (Itlog na Maalat)
Salted eggs are made by packing duck eggs in a salt-ash paste or saturated salt brine for 14 to 21 days. The curing preserves the egg and creates the distinctively salty, firm yolk that makes itlog na maalat so popular. Fresh unfertilized eggs (from hens without drakes) are preferred for salted eggs because they have a cleaner, firmer yolk. Salted egg demand has grown with the rise of premium food products incorporating it as an ingredient. This market typically commands a slightly higher per-egg price than raw fertile eggs for balut.
Other Outlets
- Fresh duck eggs (table eggs): Sold in wet markets for direct cooking. Larger market in urban areas where duck eggs are preferred over chicken eggs for certain dishes (pancit, noodle soups).
- Day-old ducklings (seho): Selling sexed or unsexed day-old ducklings to other farmers is a viable secondary income, particularly if you are operating a breeding flock with Itik Pinas pure lines.
- Culled ducks (meat): At the end of a laying cycle or when performance drops below threshold, culled hens can be sold as live birds to market vendors or dressed for duck meat (inasal na itik, paksiw). This recovers some of the sunk cost of the laying flock.
- Manure: Duck manure is a valued organic fertilizer, particularly in areas with rice and vegetable farming. Regular sale or swap of manure for farm supplies is a small but real income supplement.
13Cost and Return Estimates
The figures below are based on a hypothetical 500-duck confined laying flock using Itik Pinas under good management. These are illustrative estimates, not audited farm accounts. Input costs and egg prices vary by province and season. Always obtain current local prices for feed, day-old ducks, and eggs before committing to a budget.
| Item | Basis / Notes | Estimated Amount |
|---|---|---|
| INCOME | ||
| Egg sales | 500 hens x 200 eggs/year = 100,000 eggs; at P10/egg average | P1,000,000 |
| Culled duck sales | Estimated 450 hens culled at end of cycle at P200/bird | P90,000 |
| Gross Income | P1,090,000 | |
| EXPENSES | ||
| Day-old ducklings | 550 ducklings (10% buffer) x P80/head | P44,000 |
| Feed (starter to layer) | 500 ducks x 12 kg/bird starter–grower + 500 x 40 kg/bird/year layer | P380,000 |
| Housing and equipment (amortized) | Estimated over 3 years | P60,000 |
| Labor | 1 full-time caretaker at provincial wage rates | P120,000 |
| Veterinary and medicines | Vaccines, dewormers, vitamins | P25,000 |
| Utilities (water, electricity) | P20,000 | |
| Miscellaneous | Bedding, equipment maintenance, transport | P30,000 |
| Total Expenses | P679,000 | |
| Estimated Net Income | 500-duck flock, 1-year laying cycle | P411,000 |
14Frequently Asked Questions About Duck Farming
What is the best duck breed for egg production in the Philippines?
Itik Pinas, developed by BAI-NSPRDC in Tiaong, Quezon, is the best available native breed for Philippine conditions. It produces over 200 eggs per hen per year with eggs weighing 65 to 75 grams — exactly the size preferred by balut and salted egg processors. The crossbred Itik Pinas-Kayumanggi offers the added convenience of feather-color sex determination at hatch.
At what age do ducks start laying eggs?
Philippine native egg-type ducks and Itik Pinas typically begin laying at about 5 months (18 to 22 weeks) of age. Ducks in well-managed confined systems with proper nutrition tend to reach laying maturity slightly earlier than those raised entirely on free-range paddies.
How many eggs does an Itik Pinas hen lay per year?
Under good management with confined rearing and proper nutrition, Itik Pinas hens produce over 200 eggs per year per bird. In comparison, traditional native itik (paitlugin) in free-range systems typically produce 55 to 70% laying rate annually, which translates to 200 to 255 eggs per year at peak but averages lower across the full production year with management variability.
What is the difference between free-range and confined duck farming?
Free-range herds ducks in rice paddies where they forage naturally, cutting feed costs dramatically during the growing phase. Confined keeps ducks in permanent housing with commercial feed throughout the production cycle. The combined system — free-range growing from 1 to 4.5 months, then confinement for laying — is the most common and cost-effective approach used by experienced Philippine duck farmers.
How long do ducklings need artificial heat?
Newly hatched ducklings need brooding at 32 degrees Celsius for the first two weeks of life. From the third week onward, they can regulate their own body temperature and no longer need supplemental heat under normal Philippine ambient temperatures.
Is duck farming profitable in the Philippines?
Yes, when done properly. Duck farming ranks second only to chicken in Philippine poultry income potential. The key drivers of profitability are breed quality (Itik Pinas outperforms traditional itik significantly), feed management, and proximity to balut or salted egg processing markets. A 500-hen flock managed under the combined system can generate a net income of P300,000 to P450,000 per production year under current conditions.
Where can I buy Itik Pinas ducklings?
The primary source is BAI-NSPRDC in Brgy. Lagalag, Tiaong, Quezon. Accredited partner multiplier farms in Nueva Ecija, Batangas, Laguna, and Quezon also supply seho and breeding stock. Contact your nearest DA Provincial Agriculture Office for referrals to accredited suppliers in your region.
More Poultry and Livestock Guides


)
0 Comments